Quickly resize a lot of images in Photoshop
Over the weekend I needed to resize an entire folder full of photos from my brothers graduation so I could upload them to the web without it taking 100 years to complete. I could have simply opened up each image in Photoshop, resized & re-saved them however that would have probably taken longer than the upload so I did a little research into automating the process.
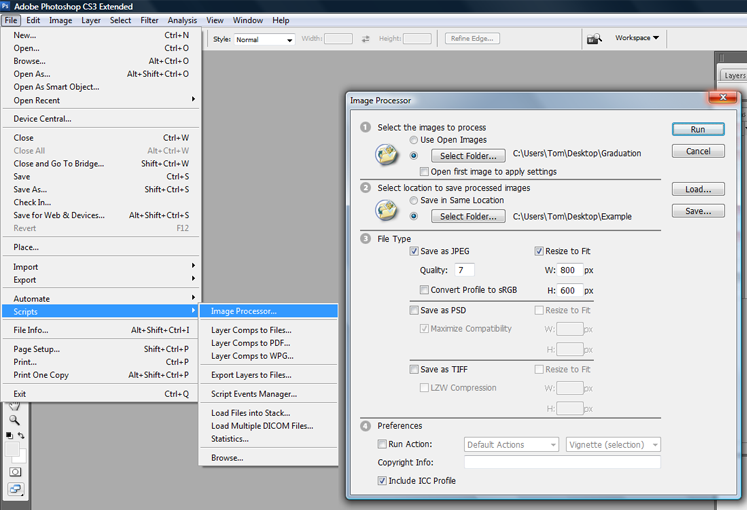
I found a couple of ways of going about a bulk resize of lots of images within Photoshop, the simplest method was to use the ‘image processing’ option within File > Scripts > Image processing which gives you the following screen:
The first three steps are really the only ones you need to worry about:
-
Choose where you want to load the images from.
-
Choose where you want the images to be saved (I would always choose a new location rather than replacing the old images just in case something goes wrong!)
-
Choose the format you want to save the resized image as & the dimensions - the proportions of the images are constrained so will still have the same aspect ration & won’t be stretched/shrunk.
Once you are happy with the configuration click the ‘Run’ button & let Photoshop do all the work for you!
If you want carry out some slightly more complex operations like converting all your images to black & white then you should have a play around with the ‘actions’ panel (Window > Actions). If you’ve ever created a macro in Microsoft Word for example, it’s pretty much the same thing - you carry out a bunch of processes & Photoshop will record the steps you take and let you perform all the steps again via a batch (File > Automate > Batch). I recommend having a look at some of the default batch actions & then try to record your own!
If you have any questions or further tips then let me know in the comments below!
Filed under:

